
Form Follows Function Examples Part 01
By Feng Zhu
FOLLOWING PIPELINE
So you’ve just finished reading my “Creating Worlds with Form Follows Function” blog and want to give it a try yourself. Sounds like a good plan so let’s get started. Before drawing anything, we need to setup some guidelines to help “contain” the design. This will ensure that our final images are grounded, usable and demonstrate good understanding of the real world. This is my recommended formula:

First, pick a real-world culture. For example, the Romans, Japanese, Chinese, French, Persians, Egyptians, etc.
Next, pick a time period for this culture to limit your design possibilities. If you are trying this for the first time, I suggest avoiding anything futuristic (because it's hard to find references since they technically don't exist). Instead, go back in time by at least 50 years.
Finally, pick a function. Refer to my previous article to get some ideas. You can either make new designs or simply retell history as is (coming in part 2).
You still need to do some design work to find the solution, but at least you have some key elements to get you started. Now, before we actually start designing, here are some tips:

USE THESE TIPS
Take these design tips seriously. I’ve compiled this list through my many years of experience teaching thousands of students. Too many of them make mistakes early on and end up not finishing their projects. Try to plan your approach. Slow down. Take your time.
Let me explain those last two tips. What I mean by “resist designing” is exactly that. If you are doing a period piece or real-world subjects, you don’t need to inject additional made up stuff into them. For art directors, there’s nothing more frustrating than telling a junior designer “we are working on a historic piece that takes place in ancient Egypt.” and they come back with made-up architecture and random designs. Believe me, this happens more often than you think and it drives us crazy. History is already filled with interesting things so use references as much as possible.
Dam Town
Alright, onto the first example. I’m using method #1, natural causes. I chose a landscape and decided to add a dam into it. Let’s write out the formula:
Real World Culture - China
Time Period - Ancient, Ming Dynasty and earlier
Function - Dam & Surrounding Town
First step is to grab the right references. Try to avoid using other people’s concept art. Use real world references as much as possible. Notice how much of the references I ended up using directly on the final images. This is why we need good references. It saves time and makes things more real and believable.


ROUGH SKETCHES
You don’t need to draw nice sketches. Use this time to figure stuff out. None of these drawings will end up as the final image, so focus your energy on the design and not on the drawing. We’ll be using 3D tools to refine our design, composition and camera.

3D BLOCK-IN
Nowadays, most environment designs are done in 3D. This allows us to get accurate proportions and correct cameras. It also allows us to play with the forms before committing to anything final. The key here is to find the design. Don’t focus on tiny details yet.
Once the 3D is blocked in and the camera is locked, then you can start applying details, colors and texture.


FINAL IMAGE - ESTABLISHING SHOT
The final image. Using this process, the total completion time for this image only took 2.5 days. When you plan stuff out and use real world references and design solutions, it’s much easier to produce work. Using this time scale, we can produce at least 2 images a week. That’s 8 pieces a month. Imagine doing this for 6 months. You’ll have 48 pieces - plenty to get you a job.

ADDITIONAL EXAMPLES
The following scenes take place in the same location and uses the same pipeline. I recommend doing at least 3 scenes per environment. Follow this order:
Establishing shot (camera pulled back, showing the entire environment)
Exterior view of a main area or building
Interior view of the same location


FINAL IMAGE - EXTERIOR SHOT OF TOWN
Reverse establishing shot of dam town. Again, notice how much of the world is derived from my references.

ROUGH SKETCHES
These are roughs sketches for the interior design. Notice the use of references to support the sketches.


FINAL IMAGE - INTERIOR SHOT
Interior house design. Showcasing life style, architecture and mood.

Mine Town
In this second example, I'm using the "time swap" method mentioned in the previous article. I'll be combining the massive scale of current day mining with the ancient world of China. Let's setup the formula:
Real World Culture - China
Time Period - Ancient, Ming Dynasty and earlier
Function - Huge mine and nearby town
Again, start with good references.


ROUGH SKETCHES
Keep sketches loose. These are for yourself. Use this time to find the design instead of trying to draw everything nice. Nobody will see these sketches except for you.
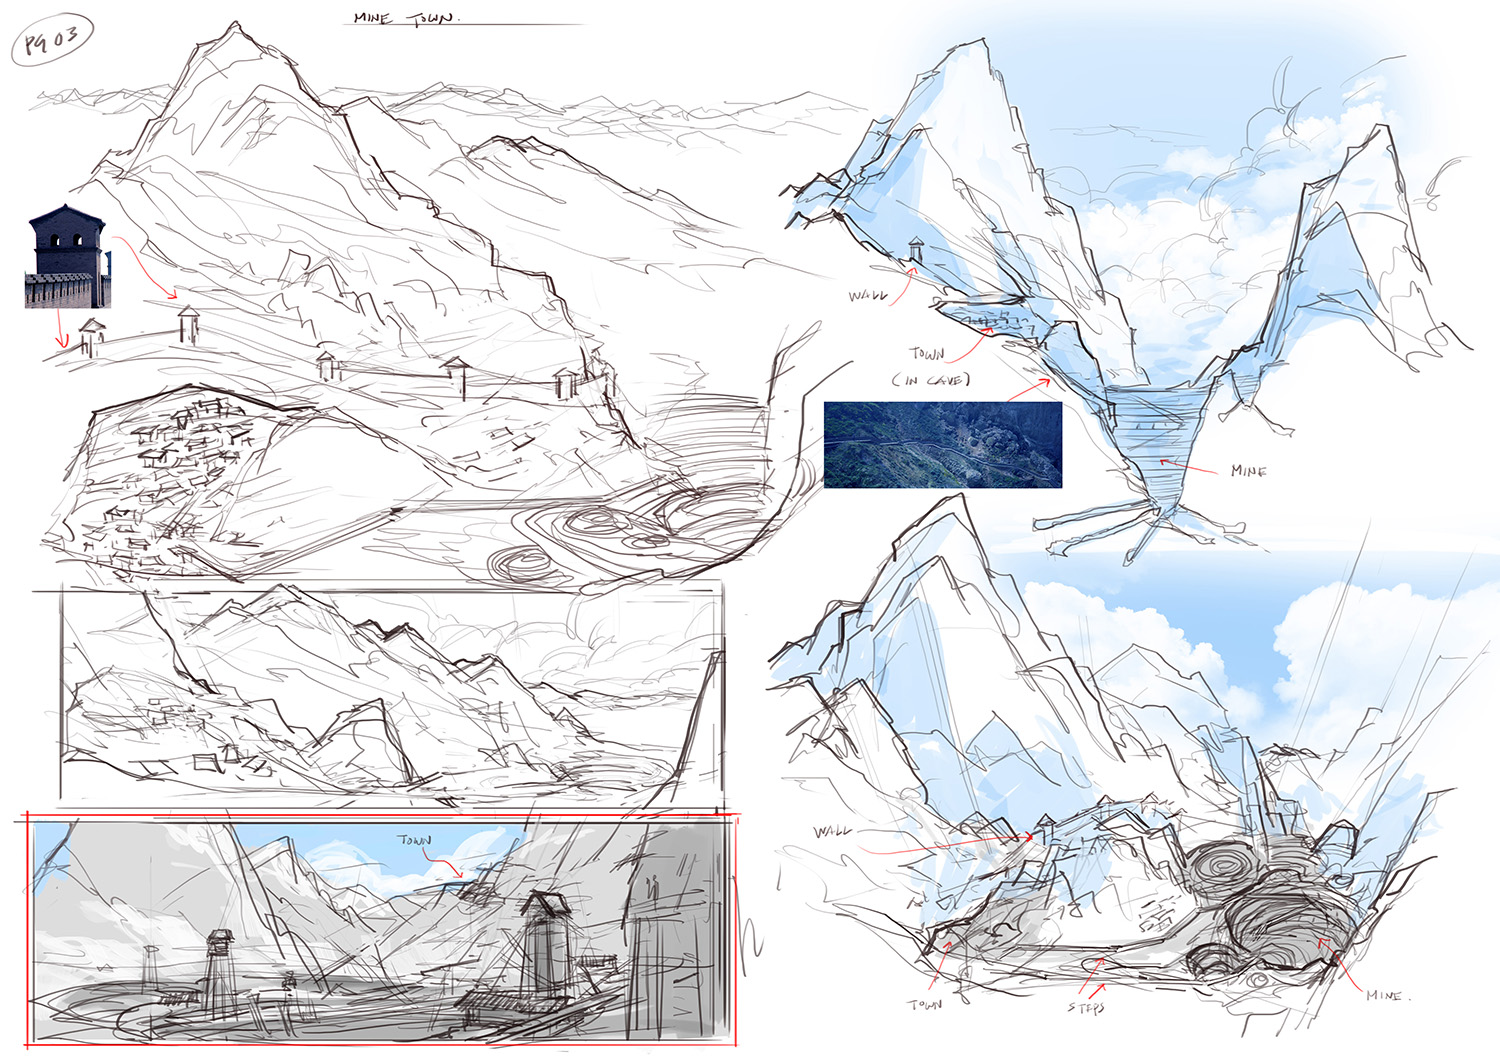
3D BLOCK-IN
Block in the main geometry before adding details. Find the final camera angle.


FINAL IMAGE - ESTABLISHING SHOT OF MINE & TOWN
Showcasing the huge mines and manual workforce.

ROUGH SKETCHES
Additional sketches for town design and interiors.


FINAL IMAGE - EXTERIOR SHOT OF TOWN
Showing the dangerous conditions and harsh environment.

3D BLOCK-IN FOR INTERIOR
Putting in rough geometry to find the design.
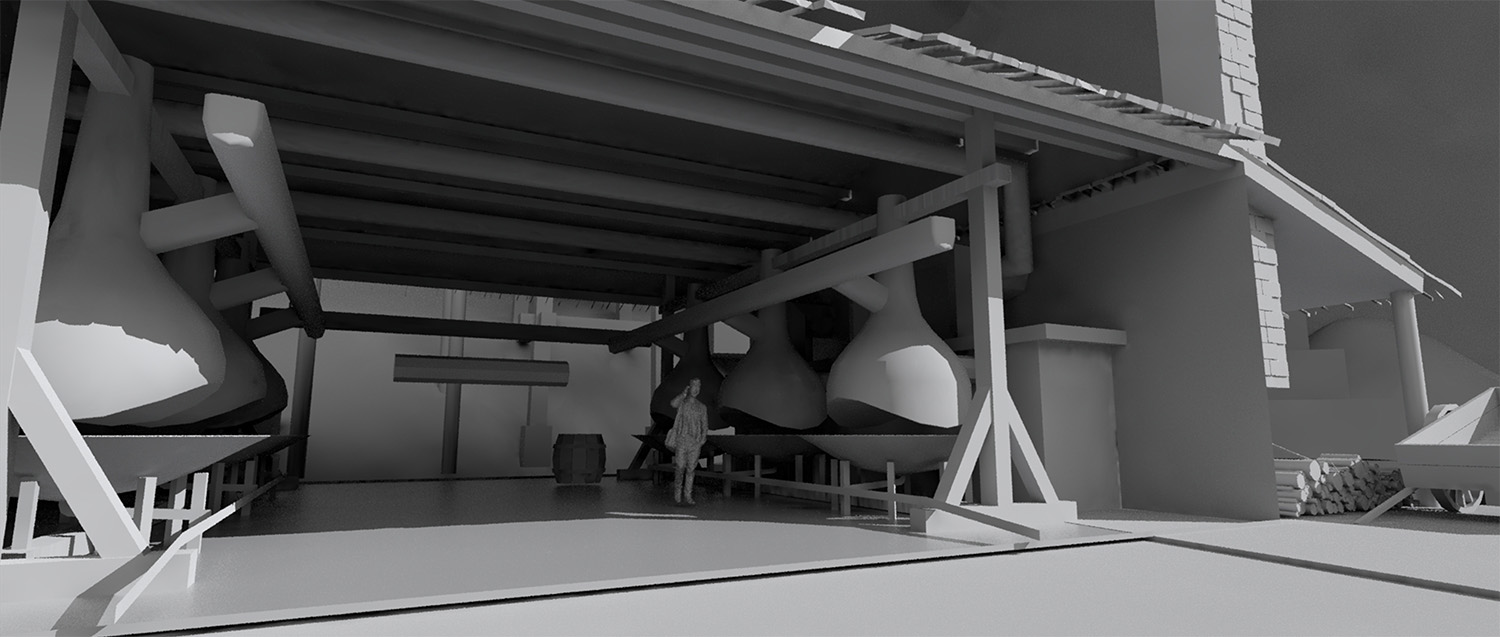

FINAL IMAGE - INTERIOR SHOT OF SMELTER
Workers are busy melting down raw materials carried up from the mines and turning them into ingots.

FINAL IMAGES - ADDITIONAL INTERIOR SHOTS
A few follow up shots to illustrate the interior living spaces of the workers.

