Design Cinema Episode 96
By Feng Zhu
DESIGNING SOMETHING NEW YET FAMILIAR
Welcome to Episode 96 of Design Cinema. My goal is to design an environment which looks new and iconic yet retains enough familiar elements to stay grounded. I solve this challenge by utilizing the “Forms Follows Function” method outlined in Episode 95 as well as using the formula I’ve devised especially for students.
As I’ve mentioned numerous times in the past, when creating worlds, you don’t have to start from scratch. By using real-world references to drive 90% of your base design and adding in the last 10% difference, you can generate solid and believable designs within a short amount of time. In some cases, you can rely 100% on real-world references and bring historic worlds back to life.
Okay, so let’s get started. First things first - we need to fill in the starting formula:
1. Choose a real-world culture: Japanese
2. Choose the time period: Edo Period
3. Choose the function you are trying to solve: Getting out of the cold
With the above formula filled in, I can start looking for references. At this stage, I’m not thinking about design solutions yet. I want the reference images to drive my imagination for a while. However, I am constantly keeping the design goal in mind.
As I gathered more and more references, random ideas and visuals start to spark in my mind. One particular image kicked off the entire design solution. The image (below) is that of a very long Japanese styled walkway. The entire structure reminded me of a black serpent. The roof tiles resembled shiny scales while the smooth curve emulated a snake’s body movement. I knew right away that this image was going to set the iconic visual for this project.

This architectural form reference is perfect in both functionality and iconic recognition.
COLLAGE REFERENCES TO SAVE TIME
When working on projects, I prefer to collage my references onto single sheets instead of having them scattered in various folders. This helps increase workflow without having to waste time searching for a particular image.

References are kept in "loose" format when collecting. But during actual production, I collage them into single A3 sheets for quick reference (see below).


Examples of my collaged references. You don't need to include every single reference from the initial collection. Just insert only the ones you will actually use.
START WITH ROUGH SKETCHES
I often start with side and plan views to kick off an idea. This minimizes the difficulty of the drawings and allows me to focus entirely on the design. Make things easy for yourself. Remember, nobody sees these sketches besides you. Draw them as messy as you want. The key is to solve the design solution at this stage. Watch Episode 94 to see me draw these ideas out in real time.

Initial sketches from Design Cinema, Episode 94. Use this time to figure out the design instead of focusing on nice drawings.

Additional sketches from Episode 94. I use this time to find the 3 camera views to establish the environments - 1 exterior and 2 interiors.
SET DESIGN GOALS
Once I found the design through rough sketches, it’s time to set a design goal. For this demo, I wanted to complete three images - one exterior establishing shot and two interiors. I like to set goals even if it’s just for a personal project or in this case, a demo for Design Cinema. Goals give me the motivation to push forward and set deadlines to meet. Personally, I don’t like to work in a fluid environment where there are no set goals and deadlines - I find this to be the perfect formula for procrastination.
EXTERIOR SHOT
With the three images set, it’s time to clean up the ideas a bit. In this case, I drew each sketch on top of premade perspective grids. By using an accurate grid, I can match the camera FOV and perspective once we go into 3D - saving a bit of time.
Since we will be using 3D software, I don’t need these drawings to be perfect. At this point, use references as much as possible to fill in the details. This helps keep your designs believable and grounded.
I generally always start with the overall establishing shot. Since we are dealing with architecture here, I wanted to make sure that the overall scale works with this “serpent” design solution.

Exterior establishing shot. This time I'm drawing on a perspective grid for better camera accuracy. I'm also using a wide FOV to make the shot more dynamic.

Cleaned up rough sketch. I only focus on the big forms and not on the tiny details - we'll use our references for that (see below).

This is where good references start to pay off. Use them to fill in all the design details and gaps. This will save you a ton of time and make your designs more believable and grounded.
ROUGH 3D
Since I have a solid sketch with proper camera FOV, matching the design in 3D is a quick process. This stage usually takes about a day to put together. Throw in some initial lighting to pull out the forms.


Since I had an initial sketch with proper camera FOV, it didn't take too long to match the shot in 3D (about 1 day of blocking).
INTERIOR SHOT 1
I repeat the same process for the first interior image. I wanted this scene to be an entrance shot showcasing mostly the interior with a bit of exposed exterior (left side). This helps connect the two scenes together. To place the viewer inside the environment, put the camera at standard eye level.
Once again, I start with a rough sketch on a perspective grid and use references to fill in the details.

Interior shot drawn on top of a perspective grid. Again, focus on the big forms first. Don't get bogged down by details at this point.

Quick clean-up sketch. Use grey marker wash to indicate lighting.
Real world references are used to fill in the details.
3D LAYOUT
Both the hallway and room interior can be mocked up at the same time.


The benefit of drawing on a perspective grid is the time saved when transitioning to 3D.
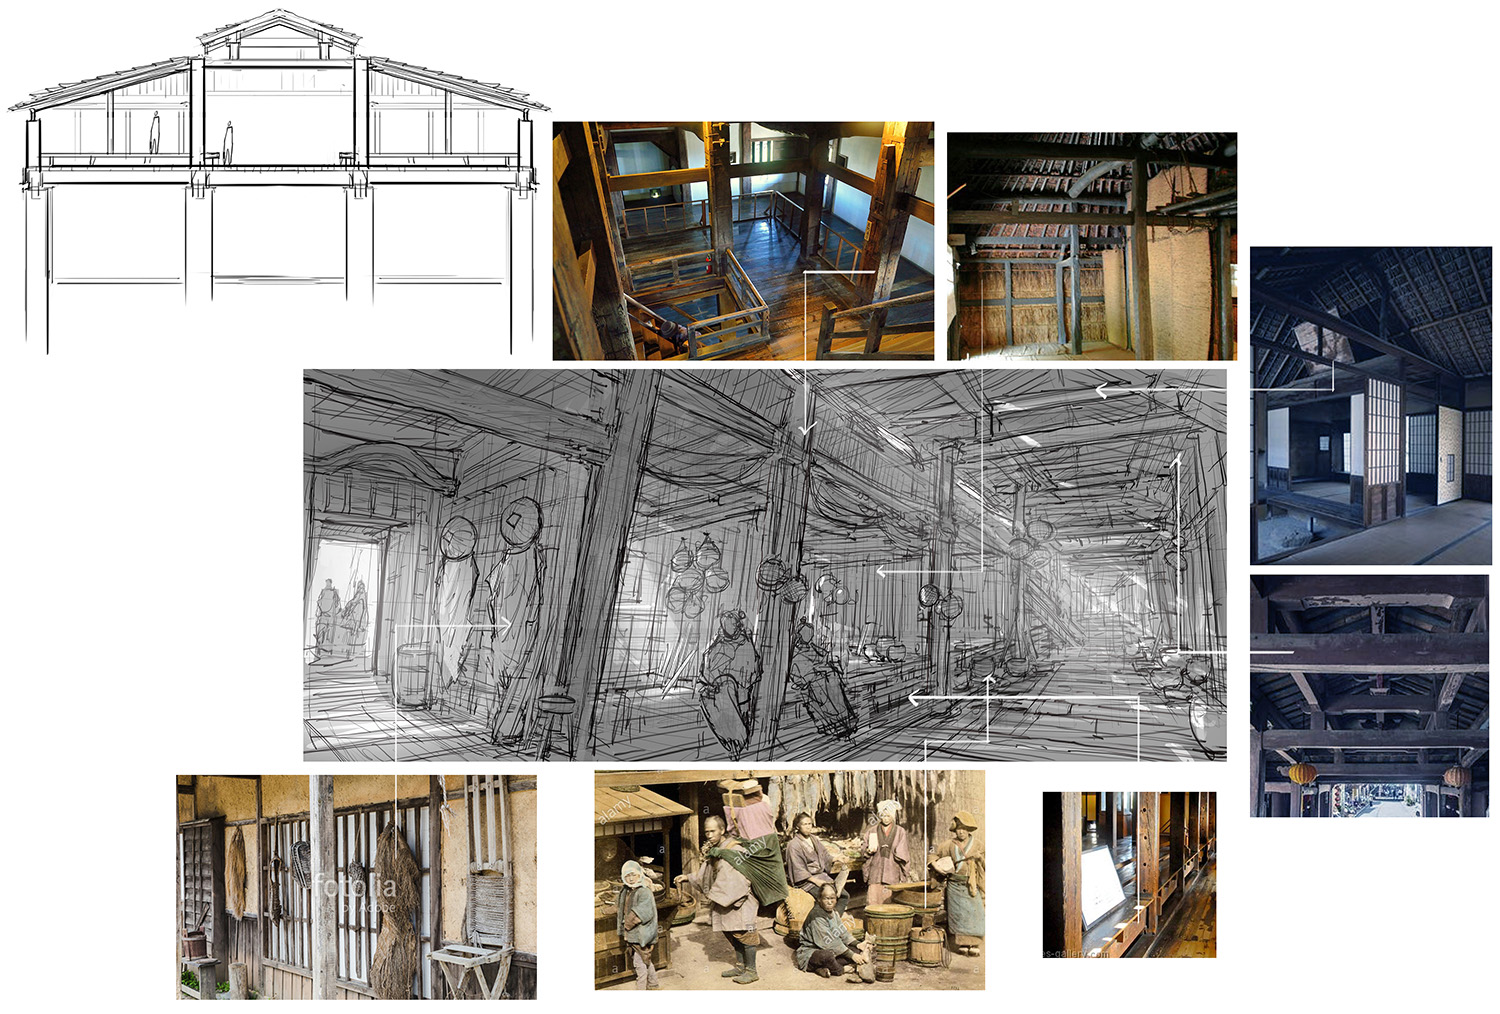
INTERIOR SHOT 2
This scene showcases the living quarters of the inhabitants. “Slice of life” interiors can really pull your viewer into the scenes. Again, use references as much as possible. For a culture like Japan, there are thousands of good references online.
Notice in this shot, I expose a bit of the hallway to the left. For each scene, I always try to carry an element from the previous scene.

Layout for living spaces. Finding the right camera angle was important for this shot. I wanted to reveal a bit of the outside hallway (interior 1) to help connect the two interior spaces together.

Cleaned up sketch. The small windows on the right allow for some nice lighting to penetrate and divide the room.

Use those references! Try to avoid designing everything on your own. When using a strong culture such as Japan, resources are bountiful.

3D block-in. Notice how closely the 3D camera matches the initial 2D sketch.
FINAL IMAGES
These three images met my personal goal of designing something new while staying grounded to reality. The exterior forms are also iconic enough to be remembered and feel believable. As you can see with these examples, you can create something new and interesting without the need to reinvent the wheel.

Final: Exterior establishing shot

Final: Interior shot - common space
